Here is the latest project I’ve been working on in my CSAI class.

It’s a Raspberry Pi Zero with makecode arcade software on it, and it can load several .uf2 games to play.
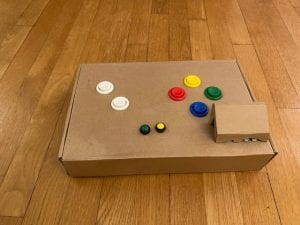
The colourful buttons are the directional ones, the white buttons as buttons “A” and “B”, and the diminutive two buttons at the top act as overall navigation controls (exit, to the game list, and menu, to the internal game menu).
Arriving at this point was actually a bit of a mistake. I misunderstood the original instructions to simply use a cardboard sheet as an anchor for the buttons, and instead used a cardboard box. Of course, after everyone at the in-person lesson finished the cardboard sheet, they had to rip it up and start over, making a “final draft” with an actual box. As I was already using a box, I didn’t have to take all the wiring apart. I simply took the switches out of the buttons, preserving the wiring, and affixed the buttons to the inside of a much cleaner, low-profile box.
Here’s another photo of the controller:

And another:
So the protruding box on top is a bit awkward, isn’t it? Initially, I wanted to place the Raspberry Pi inside the box. And it would fit, if I hadn’t decided to hot-glue a small HDMI to Mini-HDMI adapter inside as well. It happens that the adapter is a solid chunk, not bendy like other adapters, and it was a tight fit getting the RPi to fit vertically underneth the adapter. So I decided to put the RPi facing into the rear wall of the box, horizontally. Except, the HDMI adapter had been firmly glued in place, and would make a hole if I ripped it out. I did rip it out anyway, and there was a hole.
One of the reasons for getting rid of the original box was how battered and torn it was, since I’d spilt water on it, made holes in incorrect places, and let it fall of my desk many times. I chose this box just so that it would be a bit cleaner, a little more sturdy, and not an eyesore to look at. Well, I had a hole in the top of my new box, and being a bit of a perfectionist, a patch just wouldn’t do. So I moved the RPi to the top of the box (to cover the hole), used scrap wire to secure it, and fed the wires from the buttons into the RPi. I made an enclosure out of scrap cardboard, and that’s what that protruding box is.

Now here’s the inside. It’s got print on it, but that’s only because it was on the outside. (I disassembled the box and inverted it so that no print shows on the outside). It looks a bit messy, but it’s actually because those blocks that are taped up are actually pieces of stronger cardboard. Here’s a better photo:

Those are there to increase the shear strength of the top cover, because it’s relatively thin cardboard, and enough pounding on the buttons will break the box. That’s because the buttons are secured to the the top cover.
The stronger cardboard is wrapped around the button-holes to ensure that the top cover doesn’t bend, and the stronger cardboard actually made a huge difference. Now, you can hit the buttons a lot harder without damaging it.
The tape’s there to hold the wires in place. The box is just barely deep enough to hold the taller buttons, and there’s only about a centimetre for the wires. So a lot of soldering was done to make sure the wires did not slip out of their adapters (“crimpies”, I call them), and then the wires were grouped into a pin-header (and I like to call these “pinheads”, because they’re so fussy and always bend) to hold them in place.
So that’s the end of the story of my arcade controller.
And then I spilt water on it. Whatever.